Create your Workflow in a few minutes for Free !
1. Overview
| Connecting microservices within a microservices application has always been a difficult job. Indeed, event-driven architecture tools require experienced developers. Moreover, these tools require complex code full of configuration. |
1.1. What’s IOEvent ?
IOEvent is essentially a new framework for choreographing microservices. It aims to help microservices applications to link the microservices that make up the complete application with simple and easy lines of code without going further into the configuration of the "brorker" technology and without using an orchestrator like the central workflow engines.
This Framework ensures the transfer of information and communication asynchronously without waiting for a response or worrying about what happens next. Each service observes its environment. Developers will be able to connect its microservices in a short time ensuring the performance of its application thanks to the fast transfer of information between microservices, in addition allowing it to set up a monitoring of execution by process and a "dashboard" of monitoring of execution in BPM.
1.2. IOEvent Features
Before focusing on the details of what the framework provides in terms of functionality, we will list some of the goals that our framework will achieve :
| 1 | Linking Microservices: As a developer, I need to create links between microservices using simple code that defines the source and target of each event by attaching it to any object type. |
| 2 | Simple configurations: As a framework user, I need to have a default framework configuration for the technologies used by the framework, as well as simple configuration options to customize the configuration of my application. |
| 3 | execution tracking: As a user, I need to track my process execution information (number of instances, time spent per instance in a microservice). |
| 4 | Process supervising: as a user, I need a dashboard to display the process diagram created by the microservices with the link created between the microservices and display the current instances in each microservice with all the information about them. |
1.3. IOEvent Release Guide
This section summarizes IOEvent release versions, Each version of IOEvent is bound to a specific version of Java, Spring Boot and Spring Cloud version. Only these default combinations are recommended and supported by IOEvent.
| IOEvent starter Version | Java Version | Spring Boot Version | Spring Cloud Version |
|---|---|---|---|
1.x |
11 |
2.4.x |
2020.0.3 |
2.5.x |
|||
2.6.x |
2021.0.3 |
||
2.7.x |
|||
2.x |
17 |
3.0.x |
|
2.2.x |
17 |
3.1.x |
2022.0.4 |
2. Getting Started
If you are getting started with IOEvent, start by reading this section. It answers the basic what?, how? and why? questions.
|
2.1. Quick start for IOEvent
IOEvent starter dependency is available in Maven Central . You can start using IOEvent by following this steps :
2.1.1. Step 0 : System Requirements
IOEvent is developed by Spring Boot 3.1 and above, it requires Java 17 or above and Apache Kafka 2.8 or above .
2.1.2. Step 1 : Start with Kafka
To start an Apache Kafka server, you can use this docker-compose.yml file :
   version: '3.3'

volumes:
  zookeeper-data:
    driver: local
  zookeeper-log:
    driver: local
  kafka-data:
    driver: local

services:

  zookeeper:
    restart: always
    image: confluentinc/cp-zookeeper
    volumes:
      - zookeeper-data:/var/lib/zookeeper/data:Z
      - zookeeper-log:/var/lib/zookeeper/log:Z
    environment:
      ZOOKEEPER_CLIENT_PORT: '2181'
      ZOOKEEPER_ADMIN_ENABLE_SERVER: 'false'

  kafka:
    restart: always
    image: confluentinc/cp-kafka:6.2.1
    container_name: kafka
    volumes:
      - kafka-data:/var/lib/kafka:Z
    ports:
      - "9092:9092"
      - "29092:29092"
    environment:
      KAFKA_BROKER_ID: '0'
      KAFKA_ZOOKEEPER_CONNECT: 'zookeeper:2181'
      KAFKA_NUM_PARTITIONS: '12'
      KAFKA_COMPRESSION_TYPE: 'gzip'
      KAFKA_OFFSETS_TOPIC_REPLICATION_FACTOR: '1'
      KAFKA_TRANSACTION_STATE_LOG_REPLICATION_FACTOR: '1'
      KAFKA_TRANSACTION_STATE_LOG_MIN_ISR: '1'
      KAFKA_LISTENER_SECURITY_PROTOCOL_MAP: PLAINTEXT:PLAINTEXT,PLAINTEXT_HOST:PLAINTEXT
      KAFKA_ADVERTISED_LISTENERS: PLAINTEXT://kafka:9092,PLAINTEXT_HOST://localhost:29092
      KAFKA_CONFLUENT_SUPPORT_METRICS_ENABLE: 'false'
      KAFKA_JMX_PORT: '9091'
      KAFKA_AUTO_CREATE_TOPICS_ENABLE: 'true'
      KAFKA_AUTHORIZER_CLASS_NAME: 'kafka.security.auth.SimpleAclAuthorizer'
      KAFKA_ALLOW_EVERYONE_IF_NO_ACL_FOUND: 'true'
    links:
      - zookeeper
Let’s start the Kafka server by spinning up the containers using the docker-compose command :
$ docker-compose up -d2.1.3. Step 2 : Add IOEvent Dependency
To add IOEvent dependency, edit your pom.xml and add the ioevent-spring-boot-starter :
<dependency>
			<groupId>io.ioevent</groupId>
			<artifactId>ioevent-spring-boot-starter</artifactId>
			<version>${last-version}</version>
</dependency>
2.1.4. Step 3 : Add IOEvent Property
To import IOEvent properties, you can add the following to your application.properties or application.yaml file:
spring:
  application:
    name: MyAppName   (1)
  kafka:
    bootstrap-servers: localhost:29092  (2)
ioevent: (3)
    prefix: MyPrefix
group_id: MyGroupID| 1 | Application name : Required |
| 2 | Provides the initial hosts that act as the starting point for a Kafka client to discover the full set of alive servers in the cluster : Required |
| 3 | IOEvent properties which have a default values in the project. For more details see the Developers Tools section below. |
2.1.5. Step 4 : Add @EnableIOEvent
Add @EnableIOEvent annotation to the "application class", it will enable IOEventConfiguration by loading all the beans of IOEventConfiguration class.
@SpringBootApplication
@EnableIOEvent
public class MyApplication {

        public static void main(String[] args) {
            SpringApplication.run(MyApplication.class, args);
    }

}
3. Developers Tools
IOEvent includes an additional set of properties that can make the application development experience a little more pleasant.
The following table lists all the properties that are applied :
| Name | Type | Default | Description |
|---|---|---|---|
ioevent.topic_names |
List |
null |
A list of topic names that the user would like to create. |
ioevent.prefix |
String |
"IOEvent-" |
While topics creation the prefix will be added to all the topics declared in IOEvent annotations. |
ioevent.group_id |
String |
"ioevent" |
A unique string that identifies the consumer group where all IOEvent consumers belongs to. |
ioevent.auto_create_topic |
Boolean |
true |
Allow automatic topic creation on the broker when the topic is declared in IOEvent annotations only if the broker allows for it. |
ioevent.topic_replication |
String |
"1" |
Replication Factor used while creating topics, to specify the Kafka Replication Factor for the deciding the number of replicas you want. |
ioevent.api_key |
String |
" " |
API key is a unique identifier used to authenticate projects and allow to share them between IOEvent Cockpit users who owns the API key. |
ioevent.topic_partition |
int |
1 |
Specifies the number of partitions to create the topic with. |
ioevent.auto.offset.reset |
String |
"earliest" |
Specifies the auto offset reset behavior in Kafka consumer. Possible values include |
ioevent.consumers_per_topic |
int |
(number of partitions /2) + 1 |
Specifies the number of consumers per topic in the application. |
4. IOEvent Annotations
As an event driven framework IOEvent has provided several annotation to manipulate event and establish communication between microservices . in this section we will list all ioevent annotations and explain each annotation .
4.1. @EnableIOEvent
Starting with @EnableIOEvent Annotation , IOEvent needs to define extra configuration to the application , a single @EnableIOEvent annotation used on the "application class" will enable IOEventConfiguration by loading all the beans of IOEventConfiguration class
@SpringBootApplication
@EnableIOEvent
public class MyApplication {

        public static void main(String[] args) {
            SpringApplication.run(MyApplication.class, args);
    }

}
.
4.2. @IOFlow
@IOFlow annotation uses to specify the classes that contains @IOEvent methods , @IOFlow classes are processed by BeanPostProcessors to extract information from @IOEvent method , in @IOFlow we can specify the key or the name of the flow where the class methods are part of ,name of generic topic where the @IOEvent methods will send event if the topic wasn’t specified in the @IOEvent annotation and apiKey which will be attached to the events of the class methods
@Service
@IOFlow(name = "Flow_Name")
public class MyService {

	//IOEvent-Methods

}
4.3. @IOEvent
Annotation that marks a method of IOEvent, in @IOEvent you can specify the key or the name of the task, name of generic topic where the @IOEvent methods will receive and send an event if the topic wasn’t specified in the @InputEvent and @OutputEvent annotation, you also specify input as list of @InputEvent from where the annotation will receive events and output as list of @OutputEvent where the annotation will send events, you can define the method as Gateway using @GatewayOutputEvent and @GatewayInputEvent,
it’s also possible to include task type (in case it’s a task) by passing the parameter EventType which takes an EventTypesEnum.
The parameter textAnnotation takes a String and attaches it to a bpmn object in the diagram.
finally you can declare start/end method explicitly using @StartEvent and @EndEvent or declare start/end method implicitly if you don’t mention any input/output.
@IOEvent(key = "IOEvent Task",
			input = @InputEvent(key = "inputEvent", topic = "topicName"),
			output = @OutputEvent(key = "outputEvent", topic = "topicName"),
			EventType = EventTypesEnum.USER,
			textAnnotation = "text annotation")
	public Object initMainFlow(Object o) {
		//TO-Do
		return o;
	}
4.4. @OutputEvent
@OutputEvent annotation is used to produce an event which includes a key of the output and a topic where the event will be produced ( if the topic is not mentioned the event will be sent to the generic topic specified in the @IOEvent or @IFlow annotation ).
@OutputEvent(key = "Output Key", topic = "OutputTopic")4.5. @InputEvent
@InputEvent create a Listener which receive events from the topic ( if the topic is not mentioned it will listen to the generic topic specified in the @IOEvent or @IFlow annotation ), and while the listener consumes an event it will verify if the output key of the received event is equal to the @InputEvent key in order to invoke the specific method.
@InputEvent(key = "Input Key", topic = "InputTopic")4.6. Gateway annotations
Gateways determine what path is taken through a process that controls the flow of both diverging and converging Sequence Flows. That is, a single Gateway could have multiple inputs and multiple output flows.
Gateways can be divided into two types, the Exclusive Gateway and the Parallel Gateway.
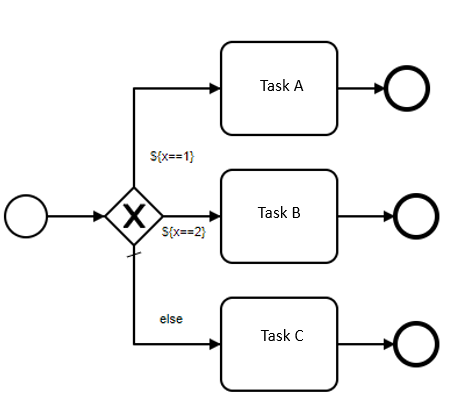
4.6.1. Exclusive Gateway
An exclusive gateway evaluates the state of the business process and, based on the returned IOResponse key, it breaks the flow into one of the two or more mutually exclusive paths.
It is based on the @GatewayOutputEvent annotation where we set the value of exclusive to true and define the list of @OutputEvent where the method will produce the event to the output with the same key of the IOResponse output key.
In IOResponse we specify the output key and the body to be send to the event.
@IOEvent(key = "Exclusive Gateway Task", topic = "topicName", //
input = @InputEvent(key = "Input_Key"), //
gatewayOutput = @GatewayOutputEvent(exclusive = true, output = { //
@OutputEvent(key = "Output_A"), //
@OutputEvent(key = "Output_B")//
}))
public IOResponse<Object> exclusiveGatewayMethod (Object body) {
if (conditionMethod(body)) {
return new IOResponse<Object>("Output_A", body);
}
return new IOResponse<Object>("Output_B", body);
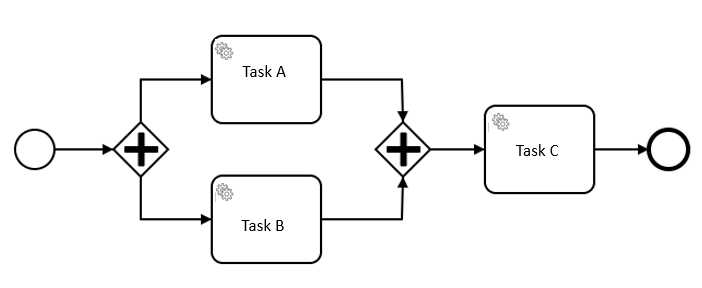
}4.6.2. Parallel Gateway
Parallel gateways are used to represent two tasks in a business flow. It models a fork into multiple paths of execution, or a join of multiple incoming paths of execution.
It is based on the @GatewayOutputEvent and @GatewayInputEvent annotation where we set the value of parallel to true and define the list of output branches @OutputEvent where to produce the event simultaneously.
@IOEvent(key = "Parallel-Gateway-Output-Task", topic = "topicName",
			input = @InputEvent(key = "Input_Key"),
			gatewayOutput  = @GatewayOutputEvent(parallel = true, output = {
					@OutputEvent(key = "Output_A"), //
					@OutputEvent(key = "Output_B")//
			}))
	public Object gatewayParallel(Object body) {
		//TO-Do
		return body;
	}
By converging parallel branches, they wait to receive all input branches @InputEvent to execute the parallel method and send the event to the @OutputEvent.
@IOEvent(key = "Parallel-Gateway-Input-Task", topic = "topicName",
			gatewayInput = @GatewayInputEvent(parallel = true, input = {
			@InputEvent(key = "Input_A"),
			@InputEvent(key = "Input_B") }),
		output = @OutputEvent(key = "Output_Key"))
	public Object gatewayParallel(Object body) {
		//TO-Do
		return body;
	}
4.7. @StartEvent
@StartEvent annotation define the starting point of a process which includes a key where we specify the name of the flow.
startEvent = @StartEvent(key = "Process name")4.8. @EndEvent
@EndEvent annotation define the finishing point of a process which includes a key where we specify the name of the flow.
endEvent = @EndEvent(key = "Process name")4.9. @IOHeaders
@IOHeaders annotation indicates that a method parameter should be bound to the headers of the event. The annotated parameter must be assignable to Map with String keys and Object values.
@IOEvent(key = "Task", topic = "topicName",
	 input = @InputEvent(key = "Input_Key"),
	 output = @OutputEvent(key = "Output_Key"))

public Object ioeventMethod (@IOPayload Object body,@IOHeaders Map<String, Object> headers) {
			//TO-Do
		return body;

	}
4.10. @IOPayload
@IOPayload annotation binds a method parameter to the payload of a the received event. It can be used also in the parallel input gateway to bind between method parameters and inputs payloads using input index.
@IOEvent(key = "JOIN TASK", //
            gatewayInput = @GatewayInputEvent(parallel = true, input = { //
                    @InputEvent(key = "Input_A", topic = "topicA"), //
                    @InputEvent(key = "Input_B", topic = "topicB") }), //
            output = @OutputEvent(key = "Output name", topic = "topicD"))
    public Object ioeventMethod(@IOPayload(index = 0) Object bodyA,
    @IOPayload(index = 1) Object bodyB) {
		//TO-Do
		}
4.11. Exception annotations
In any process, exceptions to the expected flow of execution occur, and developers need to be able to write robust application logic to recover from those exceptions. IOEvent provides the tools to define the desired reaction to those exceptions. Exception handling can be one of two ways, Handle the error or End the workflow with an error.
4.11.1. Handle Error
IOEvent offers support for handling error situations in a way that is clearly divisible from the normal flow of tasks. A typical way to take advantage of it would be to incorporate into your model a boundary event on an element in which something can go wrong.
To handle an expected exception in a task we are going to update the IOEvent annotation,
Firstly we are going to add the exception details with the @ExceptionEvent.
The exception event have two fields the first one is the list of exceptions predicted to be occurred in the task, the second is the output which is an @OutputEvent where the payload would be sent to the handling method associated to the output.
@IOEvent(
		key = "Make Discount Event",
		topic = "discount",
		input = @InputEvent("EventCreated"),
		output = @OutputEvent("EventDiscounted"),
		exception= @ExceptionEvent(
               exception = {ArithmeticException.class},
               output=@OutputEvent(
               	key = "DiscountError",
               	topic="DLQ_exception")
           )
)
public Double makeDiscount( Double price) throws Exception {
	//Potential arithmetic exception can be caused
}
The handling method is a task method that takes the payload and perform a certain business or error handling logic to recover and continue the flow .
@IOEvent(key = "Handle Error",
			topic = "discount",
			input = @InputEvent(
				"DiscountError",
				topic="DLQ_exception"),
			output = @OutputEvent("HandledError"))
	public Double handleError(Double price) throws InterruptedException {
		//Handling the arithmetic exception
	    return price;
	}
4.11.2. End with error
We can choose to end the flow with an error in this case we use the second version of our annotation.
Inside the @ExceptionEvent we specify the list of exceptions predicted to be thrown by the task and we finally we add the @EndEvent which define the end of the flow with an end error.
@IOEvent(
		key = "Make Discount Event",
		topic = "discount",
		input = @InputEvent("EventCreated"),
		output = @OutputEvent("EventDiscounted"),
		exception= @ExceptionEvent(
               exception = {DataFormatException.class},
			 	endEvent=@EndEvent("End with error")
			 	)
)
public Double makeDiscount( Double price) throws Exception {
	//Potential error can be caused
}
4.12. Timer Annotations
We may need to schedule, to delay or to include a defined timer that trigger a subprocess or the workflow itself .
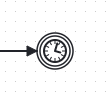
4.12.1. Start Timer
IOEvent provides the start timer annotation which consist of triggering the start of a process according to a specific time date or a time cycle definition.
Once the timer is triggered, a new process instance is created, and the corresponding timer start event is activated.
To implement this using IOEvent framework we have to add the @IOTimer annotation to the @StartEvent with the specific time definition.
@IOEvent(
key="Start cleaning every 5 min",
startEvent = @StartEvent(
key="Periodic cleaning",
timer=@IOTimer(cron="* */5 * * * *")
),
output = @OutputEvent(key = "order to clean"))
public void scan() {
//scan process
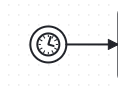
}4.12.2. Intermediate Timer
An intermediate catch event requires a time duration to determine its triggering time. Upon entering an intermediate catch event, a timer is scheduled.
At this point, the process instance pauses and remains in a waiting state until the timer is triggered. Once the timer is triggered, the catch event is considered completed, and the process instance resumes its execution. and to implement this feature we add the @IOTimer annotation into the _@IOEvent annotation and we set the delay time with the appropriate time unit.
@IOEvent(key="Coffe Break",
		input=@InputEvent(key="take a break"),
		output=@OutputEvent(key="back to work"),
		timer=@IOTimer(delay=5, timeUnit = TimeUnit.MINUTES))
public void takeBreak() {
	//delay
}
4.13. @IOTimer
Timer events are events triggered by a defined timer.
4.13.1. Timer start events
A process can have one or more timer start events (besides other types of start events). Each of the timer events must have either a time date or time cycle definition.
When a process is deployed, it schedules a timer for each timer start event.
When a timer is triggered, a new process instance is created.
@IOEvent(
           key="Timer start event",
           startEvent = @StartEvent(
                   key="start event",
                   timer=@IOTimer(cron="*/2 * * * * *")
                   ),
           output = @OutputEvent(key = "output"))
   public Object methodToExecute() {
       //TODo
   }
4.13.2. Intermediate timer events
An intermediate timer catch event must have a time duration definition that defines when it is triggered.
When an intermediate timer event is entered, a corresponding timer is scheduled. The process instance stops at this point and waits until the timer is triggered. When the timer is triggered, the catch event is completed and the process instance continues.
@IOEvent(key = "intermediate timer",
		input = @InputEvent("input"),
		output = @OutputEvent("output"),
           timer = @IOTimer(delay = 1,timeUnit = TimeUnit.MINUTES ))
   public object methodToExecute() {
       //toDo
   }
4.14. User Task annotations
A User Task is a typical “workflow" Task where a human performer performs the Task with the assistance of a software application and is scheduled through a task list manager of some sort.
4.14.1. User Task
In IOEvent, currently, we only support user tasks that come after a certain task (we do not support, at least for now, user tasks that come as the first step of the process). To implement a user task, we need to mark the output going to the user task in the task that precedes it with the userActionRequired parameter set to true. Then, we have to add the user task with the EventType parameter set to EventTypesEnum.USER. The method representing the user task could take as an argument the payload that comes from the response of the human performer.
After this implementation, we can either use the IOEvent Cockpit to manage the user tasks (retrieve the list of tasks and send responses) or embed the IOEvent-userTask-starter (which is a starter dedicated to handling user tasks and offering specific endpoints) in a specific application that will manage the user tasks. For more information about this case, refer to the IOEvent-userTask-starter documentation.
@IOEvent(key = "step before user task",
		input = @InputEvent("input"),
		output = @OutputEvent("output to user task",
		userActionRequired = true)
           )
   public object stepBeforeUserTask() {
       //toDo
   }

@IOEvent(key = "user task",
		input = @InputEvent("output to user task"),
		output = @OutputEvent("output"),EventType = EventTypesEnum.USER
           )
   public object userTask(Object humanResponse) {
       //toDo
   }
5. IOEvent Method
In this section we will explain the structure of IOEvent method :
@Service
@IOFlow(name = "FLow Name" , topic = "topicName") (1)
public class MyService {
	@IOEvent (key = "Task Key", topic = "topicName",
			input = @InputEvent(key = "INPUT_EVENT",topic = "topicName"),
		   output  = { @OutputEvent(key = "OUTPUT_EVENT")
			}) (2)
	public MyObject ioeventMethod(MyObject body) (3)
	{
		// To-Do
		return body;
}| 1 | @IOFlow annotation is Required and to be specified on the service class that contain IOEvent methods. |
| 2 | @IOEvent annotation must be declared above IOEvent method. |
| 3 | IOEvent Method must respect 2 rules : |
-
Rule 1: For the method parameter we can use any type of object that provide no argument constructer. -
Rule 2: For the return object type, if it’s a void the method will send the received parameter into the output event as a payload, else it will send the return object specified inside the method as an output event payload.
6. IOEvent Cockpit
In this section we will present the interfaces of IOEvent-Cockpit and explain the features offered by each view.
6.1. Getting started
cockpit-api and cockpit-ui are mandatory images to use IOEvent Cockpit, so in order to run them you should :
6.1.1. System requirement
IOEvent Cockpit api is supporting Elasticsearch version 7, we are currently working on the latest versions .
6.1.2. IOEvent cockpit-api
-
Pull cockpit-api image using a specific tag :
$ docker pull ioevent/cockpit-api:tag-
Run IOEvent Cockpit-api image :
Replace the variable between {} with your personal value and run this command :
$ docker run -e ES_URL=https://{ElasticsearchHost:Port} -e KAFKA_BOOTSTRAP_SERVER={KafkaHost:Port} -p 8761:8761 ioevent/cockpit-api-
Run IOEvent Cockpit-api with docker compose :
version: '3.3'

services:
  ioeventapi:
        image: ioevent/cockpit-api:tag
        ports:
           - 8761:8761
        environment:
          ES_URL: https://ElasticsearchHost:Port
KAFKA_BOOTSTRAP_SERVER: KafkaHost:Port| Available variables | Default value | Description |
|---|---|---|
KAFKA_BOOTSTRAP_SERVER |
no default |
host/port pairs to use for establishing the initial connection to the Kafka cluster. |
KAFKA_GROUP_ID |
"ioevent-cockpit-api" |
kafka Group id for the cockpit-api. |
KAFKA_SASL_JAAS_USERNAME |
"" |
sasl jaas username to connect to kafka cluster with authentication. |
KAFKA_SASL_JAAS_PASSWORD |
"" |
sasl jaas username to connect to kafka cluster with authentication. |
ES_URL |
no default |
url to establish connection to Elasticsearch. |
ES_USERNAME |
"" |
username of Elasticsearch if exist. |
ES_PASS |
"" |
password of Elasticsearch if exist. |
ENABLE_MAIL_SERVICE |
false |
enable the mail service on the cockpit-api. |
DEFAULT_ENABLE_USERS |
false |
default enable users created by the cockpit-api. |
IOEVENT_INSTANCE_DOWN_TIMEOUT |
7000 |
time before the cockpit-api set the state of ioevent instance to DOWN. |
IOEVENT_APP_DOWN_TIMEOUT |
15000 |
time before the cockpit-api set the state of ioevent app to DOWN. |
IOEVENT_APP_DELETE_TIMEOUT |
20000 |
time before the cockpit-api delete the ioevent app and untrack it. |
6.1.3. IOEvent cockpit-ui
-
Pull cockpit-ui image using a specific tag :
$ docker pull ioevent/cockpit-ui:tag-
Run IOEvent Cockpit-UI image :
$ docker run -p 3000:3000 ioevent/cockpit-ui:tagwith the previous command the cockpit-ui will run and connect to the default cockpit-api host:port (localhost:8761) if you want to change it you can specify it in the environment variable as below :
docker run -e COCKPit_API_URL="SPECIFY YOU COCKPIT API URL" -p 3000:3000 ioevent/cockpit-ui:tag-
Run IOEvent Cockpit-UI with docker compose :
version: '3.3'

services:
  ioeventui:
   	image: ioevent/cockpit-ui:tag
   	ports:
- '3000:3000'| Available variables | Default value | Description |
|---|---|---|
COCKPit_API_URL |
localhost:8761 |
URL of cockpit-api application to establish connection and from where the cockpit-ui will consume Api(s). |
COCKPit_UI_REGISTRATION |
false |
variable to enable or disable cockpit-ui registration feature. |
6.2. Sign-In
IOEvent provide a login page where the user must enter his email and password to access the application.

6.3. Default User Credentials
After starting the IOEvent cockpit-api and cockpit-UI, you can log in to IOEvent Cockpit using the credentials of the user created by default during the startup. You can use the following credentials:
Username: io-admin
Password: admin
6.4. General interface
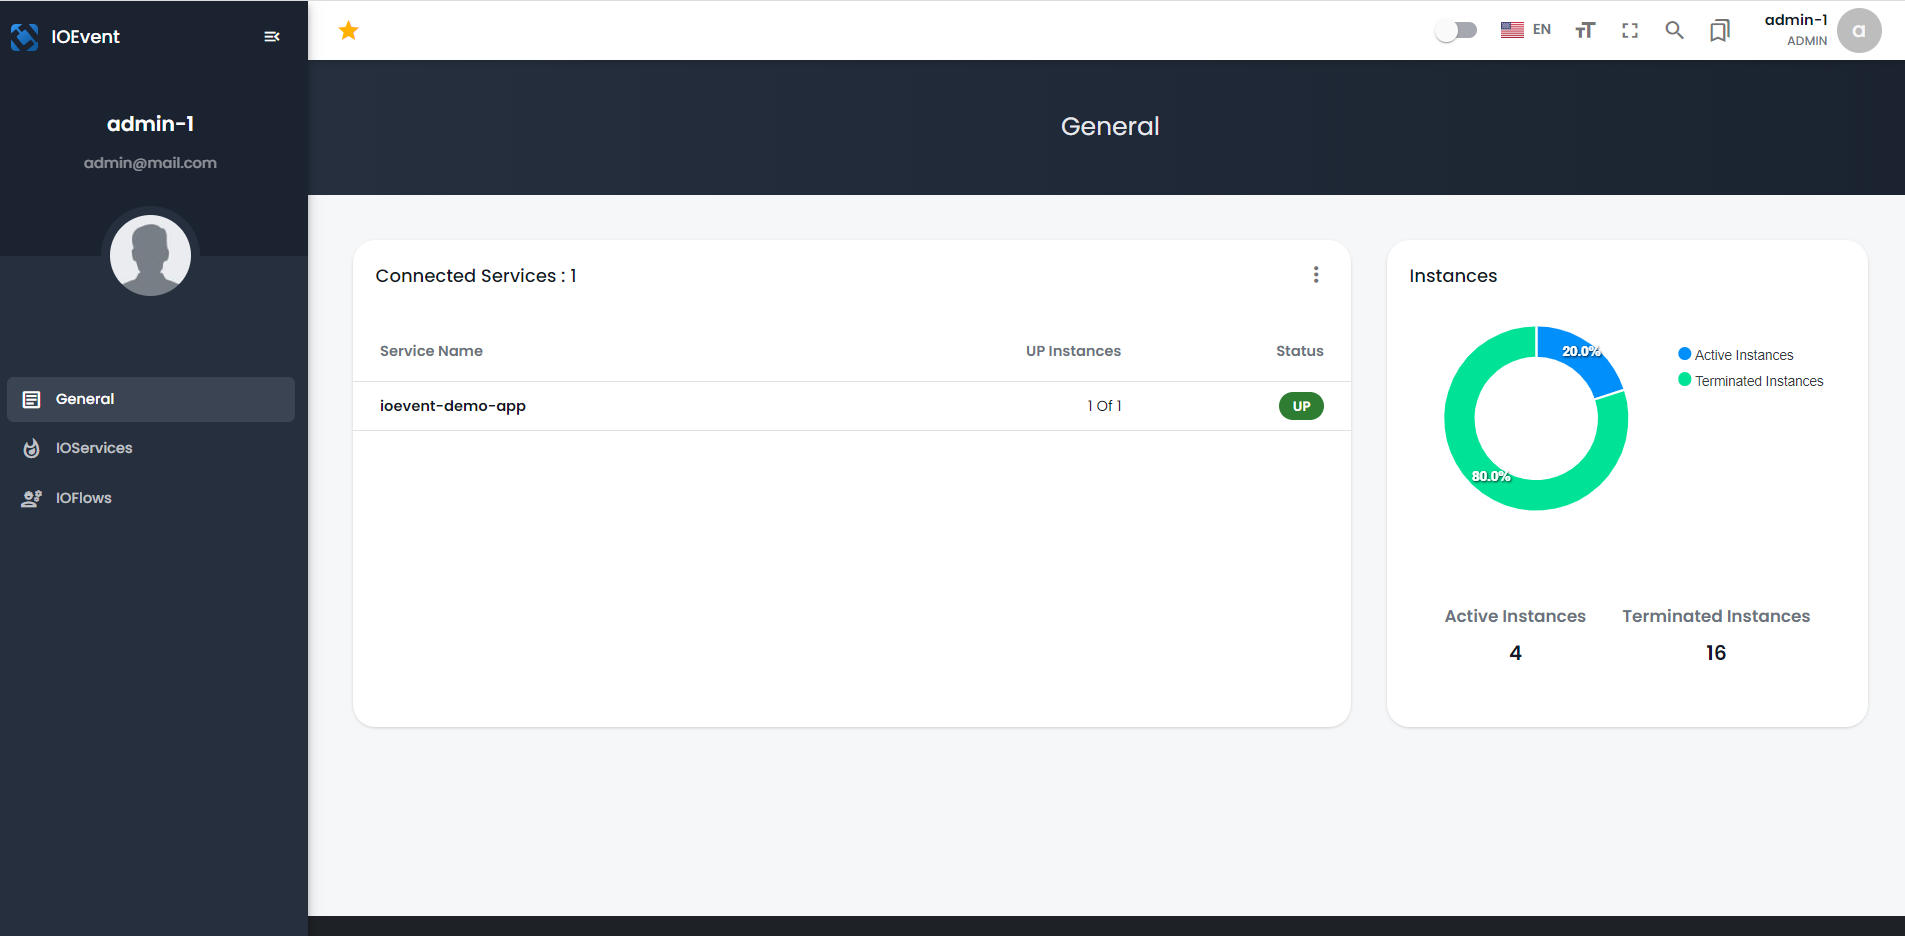
Once the user has successfully logged in, the General interface is displayed, he will find a list of his applications connected to Cockpit, and a graph that displays the number of active and completed instances as shown in figure.
6.5. IOService interface
when the user Click on IOServices on the left navigation bar it displays a list of the user services connected to Cockpit that contains the name of service , number of active instances and the status of the service , by selecting one of the services it display the informations of its instances (instance ID , Host and Port) .

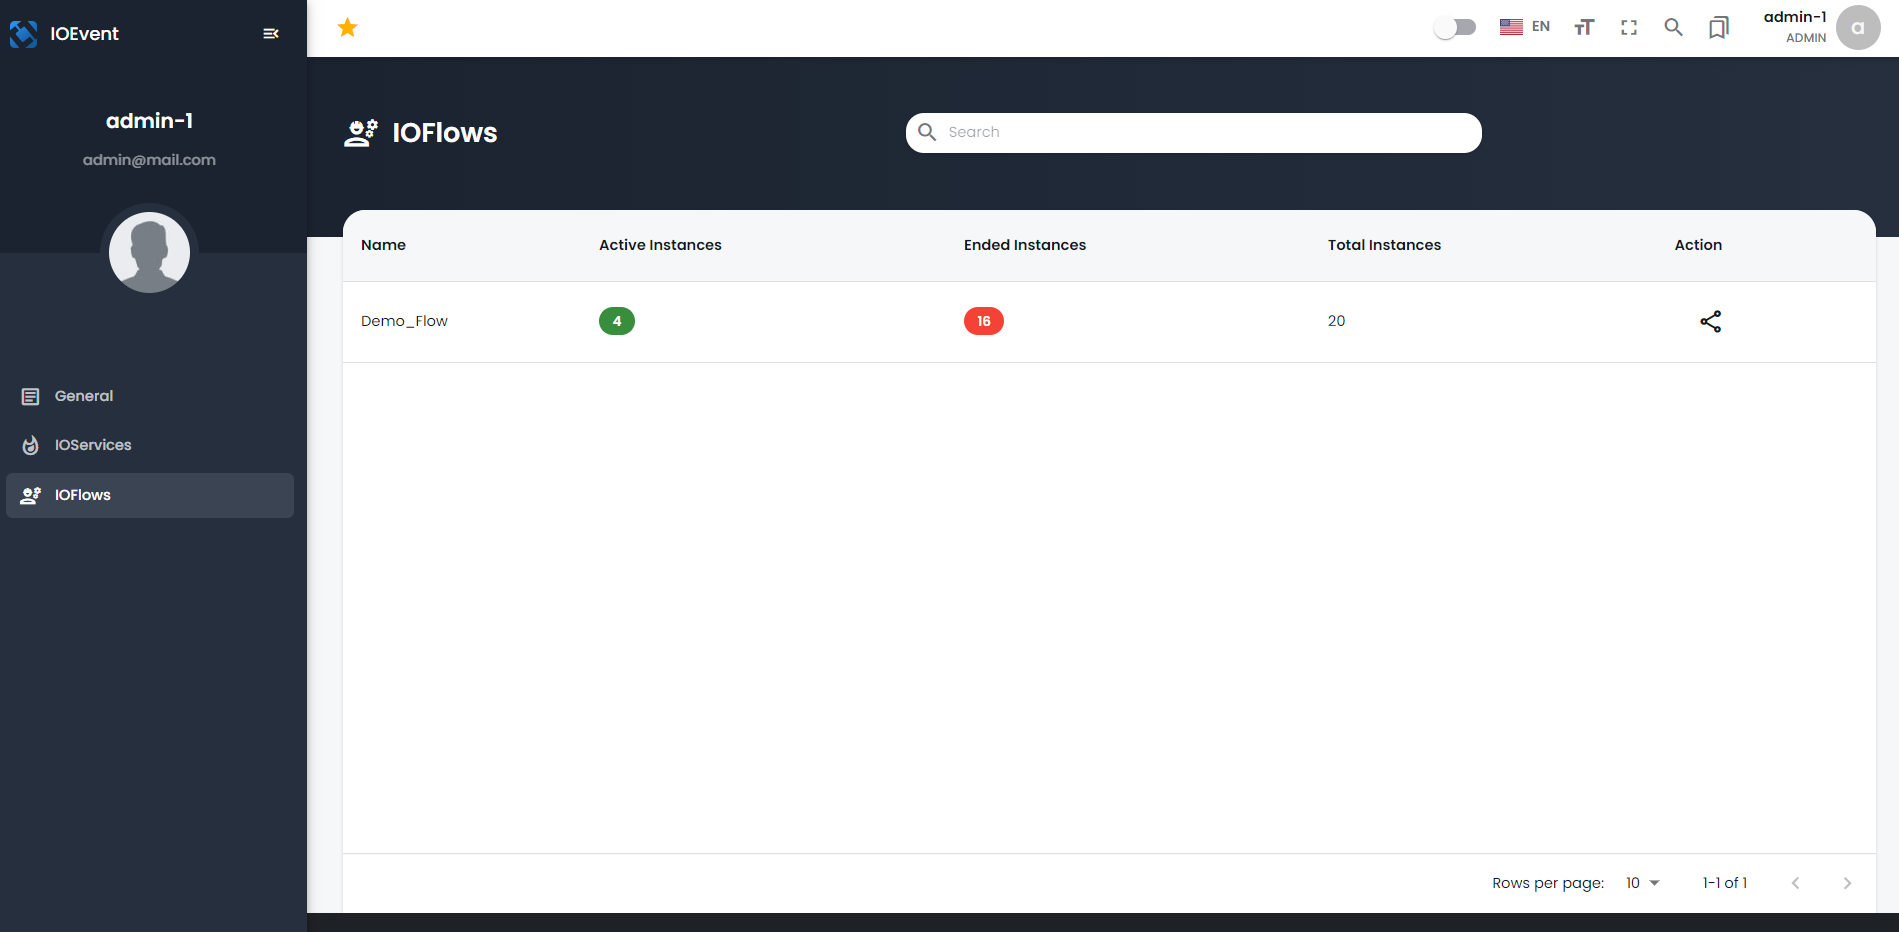
6.6. IOFlows interface
By choosing the IOFlows section It shows all the IOFlow (processes) that the user has access to, it represents :
-
Name: name of the IOflow. -
Active instances: number of active instances inside the process. -
Ended instances: number of instances that finished the process. -
Total instances: number of total instances. -
Action: allows to share the ioflow with other users.
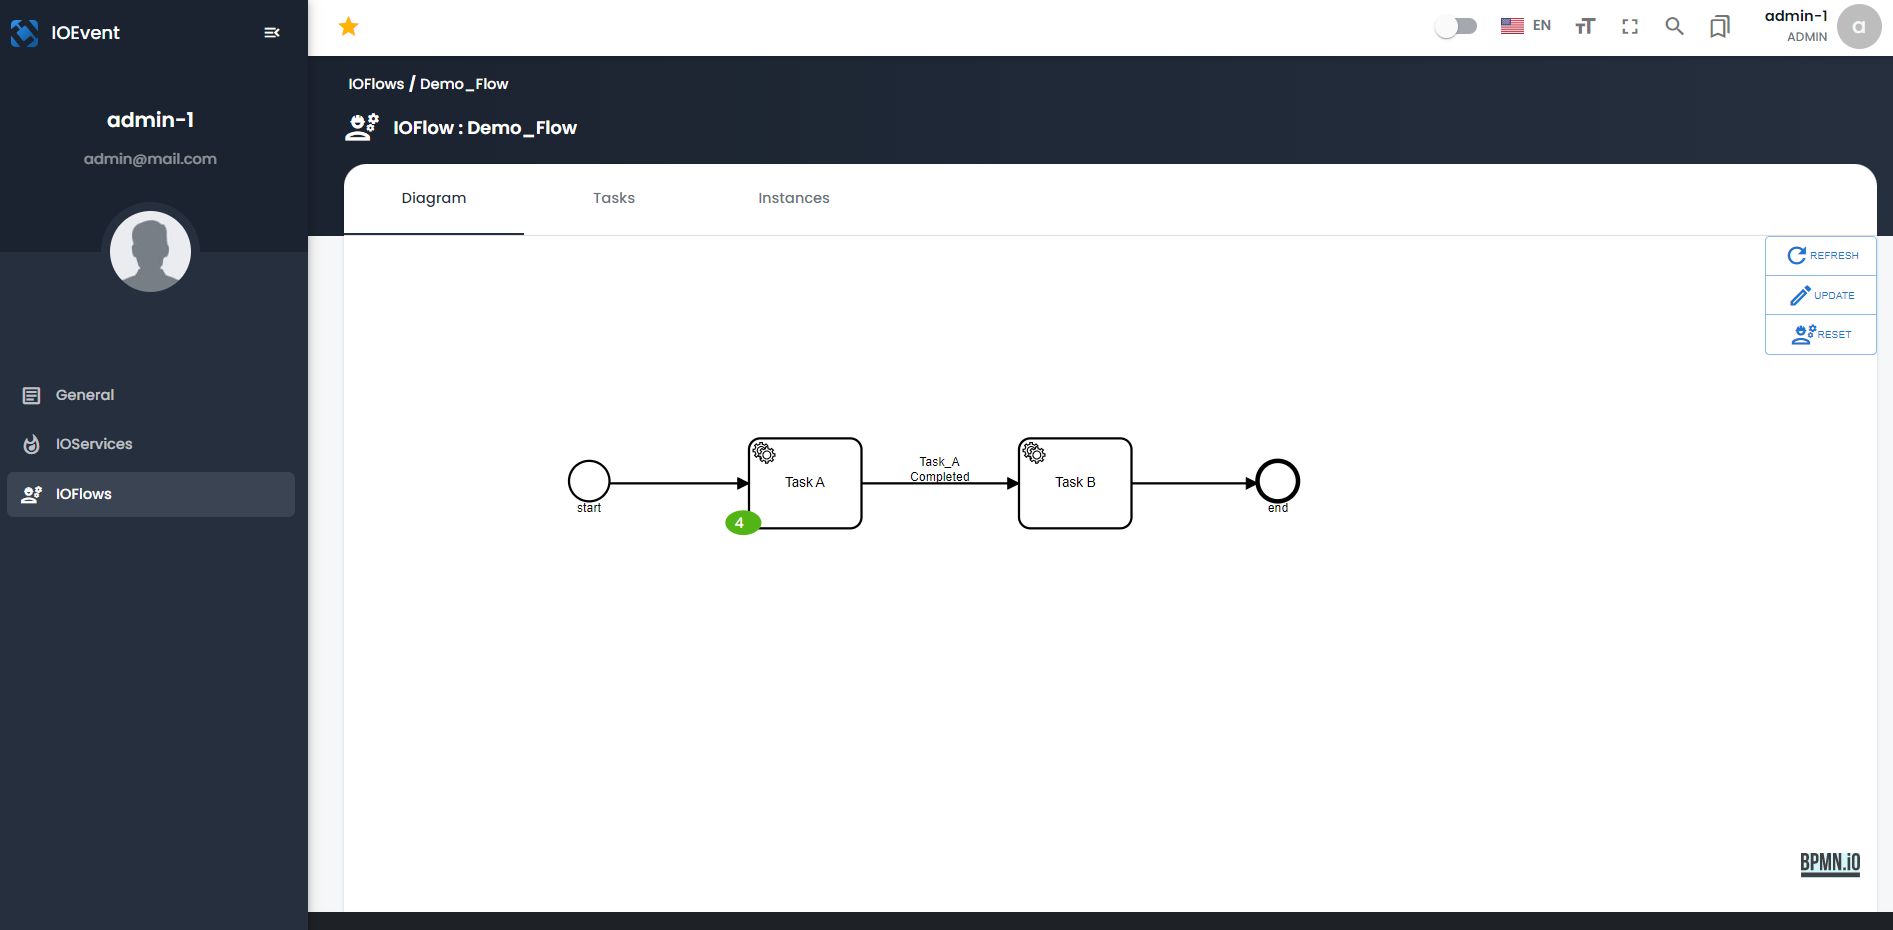
6.6.1. IOFlow Details interface
when choosing one of the processes it will display more details about the process.
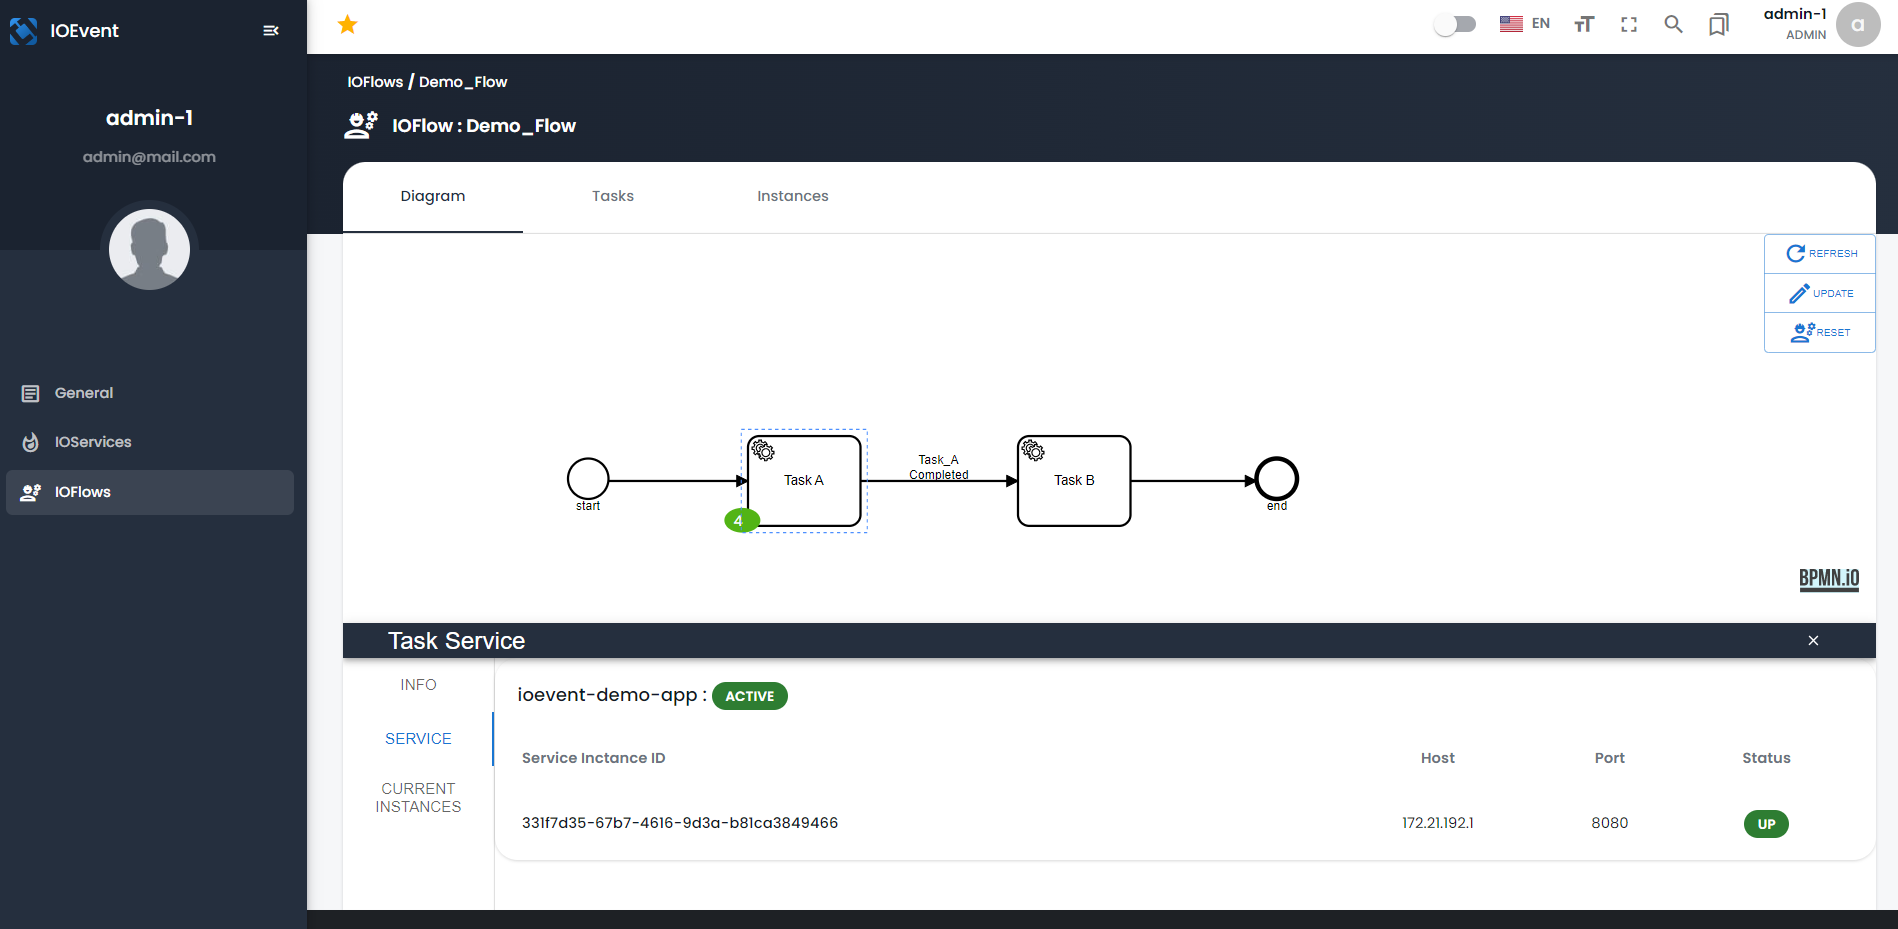
Diagram Tab
Displays the diagram generated by Cockpit after collecting the process steps from the applications. It also gives you a real-time view of processes and instances as they run, so you can monitor their status and quickly identify technical incidents that slow down or stop the process.
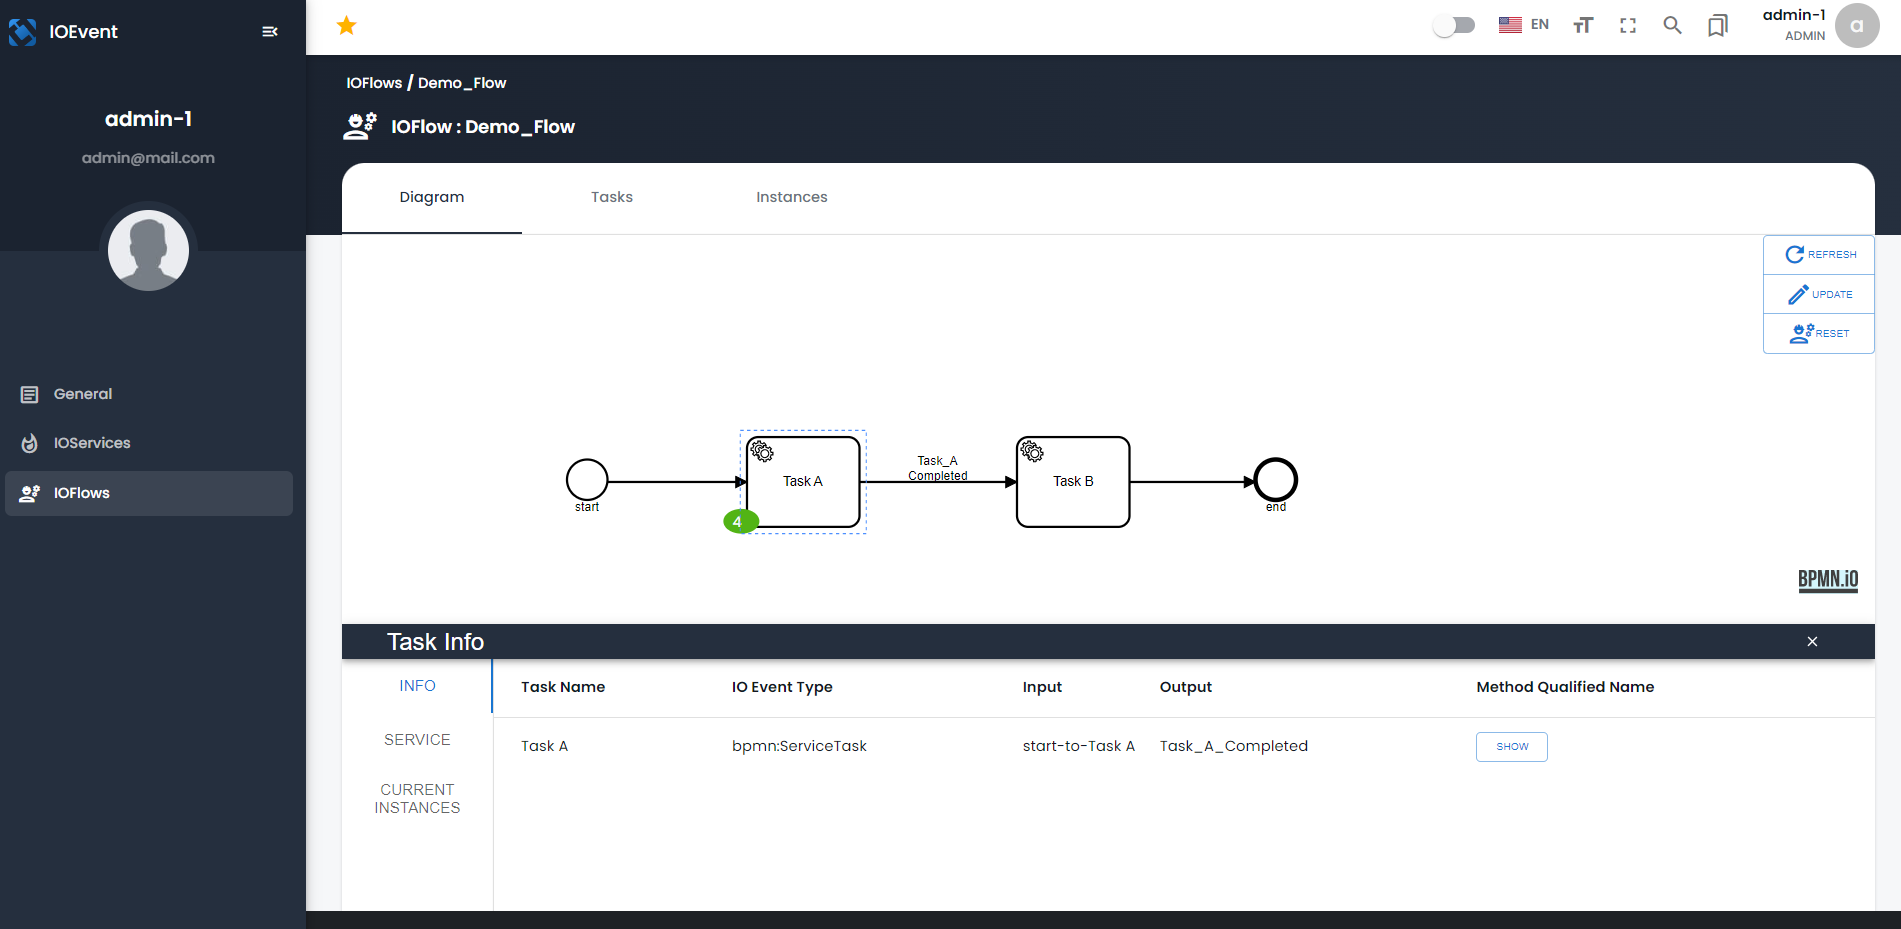
By clicking on one of the diagram tasks it opens the property view that contains :
-
Task Info section :
-
Task Name: the name of the selected task. -
IO Event Type: the type of the task. -
Input: list of inputs. -
Output: list of outputs. -
Method Qualified Name: the full method qualified name of the task in java application.
-
-
Task Service section : Displays the name of service with the current service state , also it lists informations (instance ID , Host and Port) about active instances.
-
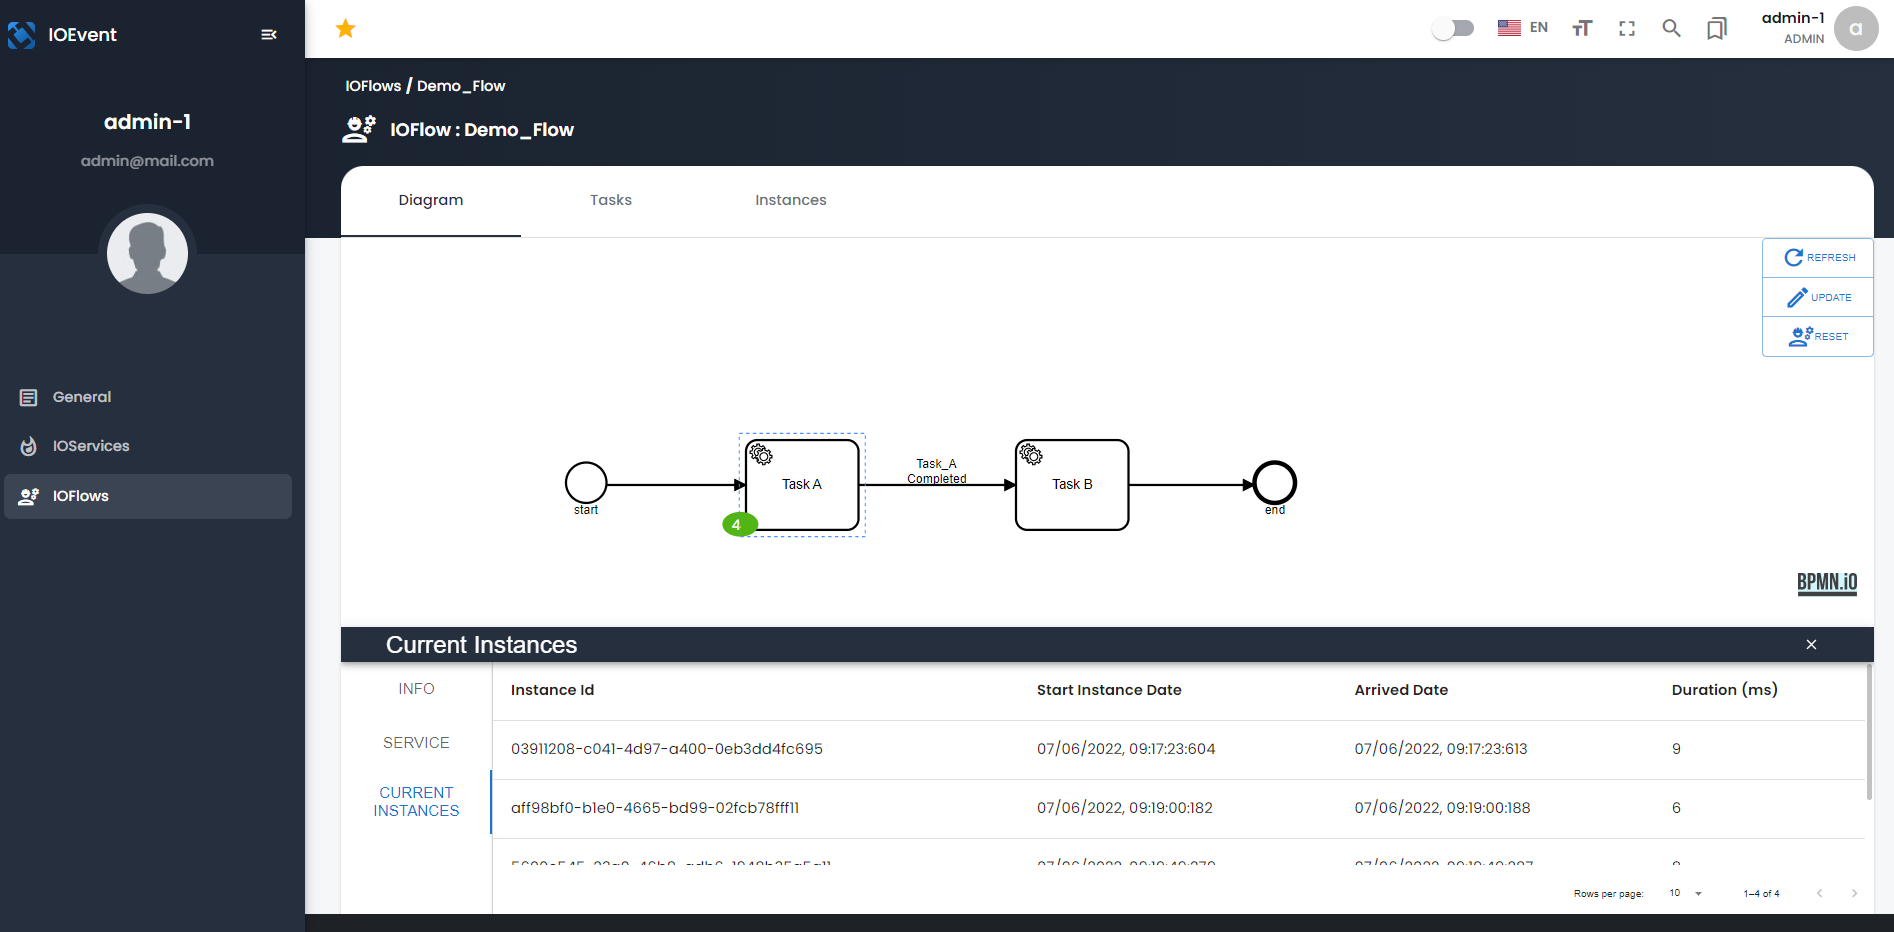
Current instances section : Displays the current instances that are running on a specific task, it represents :
-
Instance Id: ID of the instance. -
Start Instance Date: the time when the instance has started. -
Arrived Date: the time when the instance has arrived at the current task. -
Duration (ms): the duration that takes the instance to arrive at the specific task.
-
-
Advanced Instance Info section : When choosing one of the current tasks it display the Advanced Instance Info.

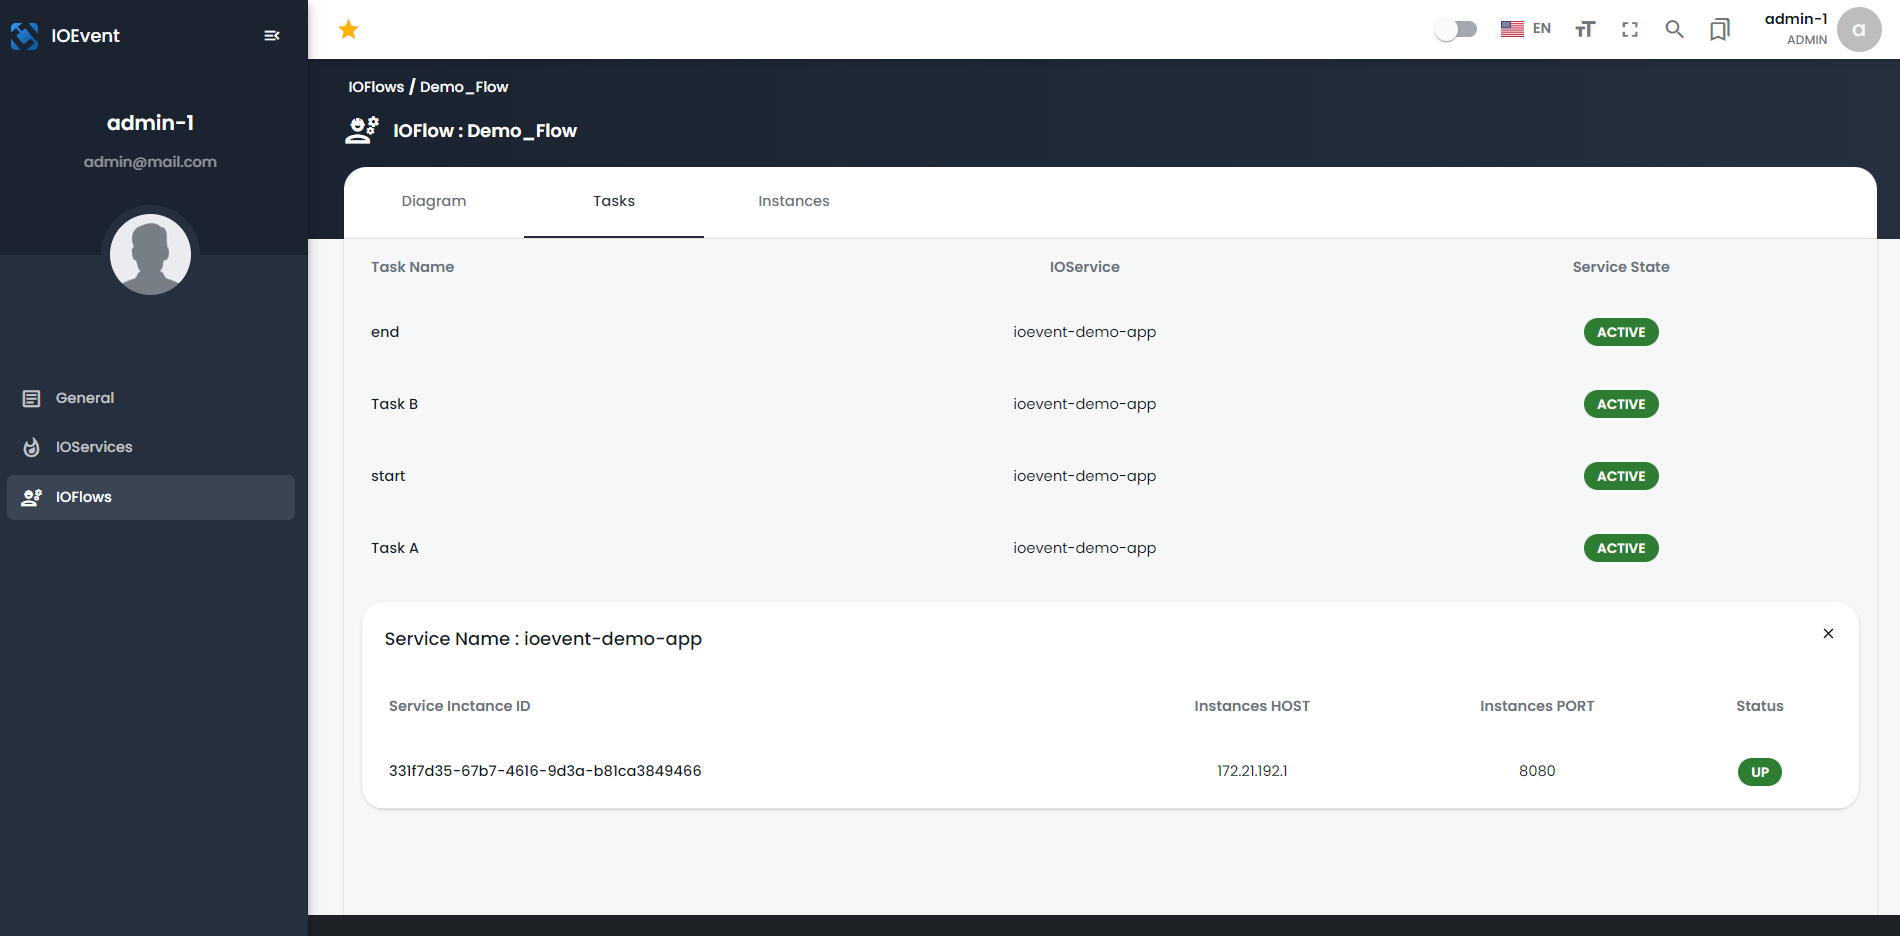
Tasks Tab
Displays all the steps or tasks that compose the process together. which include the service name responsible for executing the tasks also you can find the actual state of the service , by selecting one of the services it display the informations of its instances (instance ID , Host and Port) .
Instances Tab
Lists the instances executed on this process, it represents :
-
Instance Id: the instance Id. -
Process Name: name of the process. -
Start Time: time when the instance has started. -
End Time: time when the instance has finished (void if the instance still running). -
Instance Duration (ms): duration of the instance in milliseconds. -
Status: state of instance (Active/Finished). -
Payload: current payload of the instance.

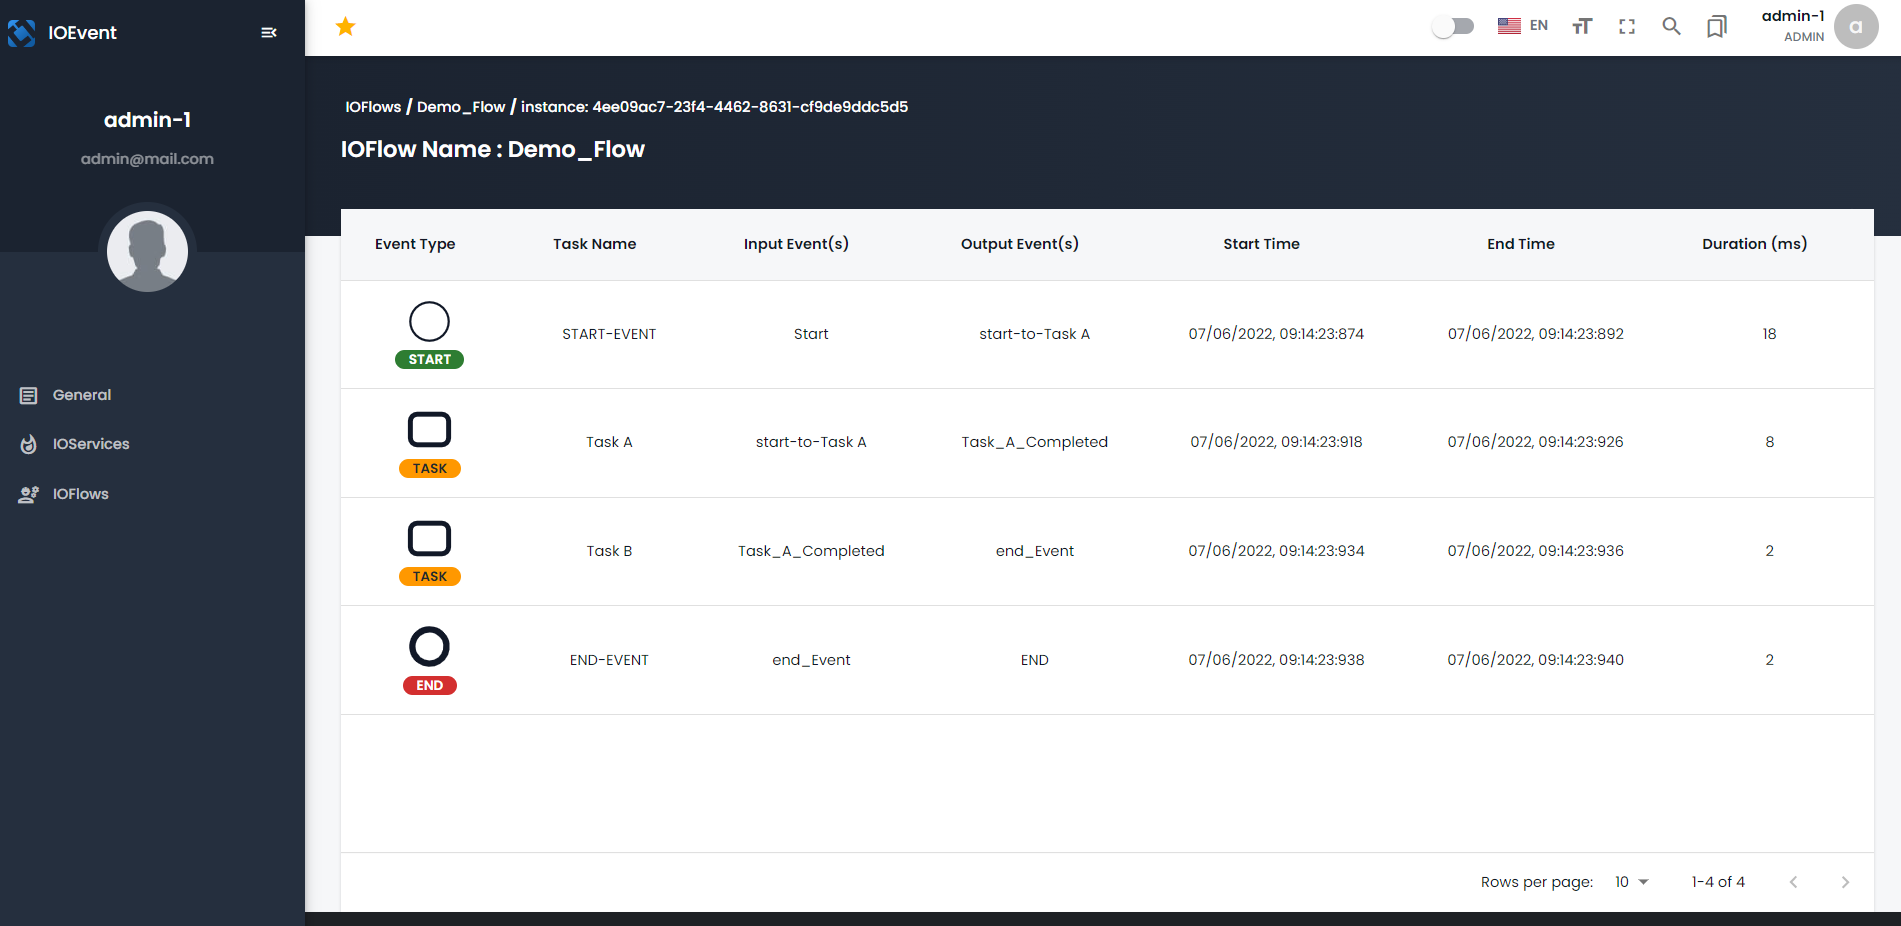
Instance Details : for each instance, we have the instance details to present the list of step history, through which the instance went, it represents :
-
Event Type: to specify the Task type (Start - End - Task - Parallel Gateway -Exclusive Gateway ). -
Task Name: the name of the task . -
Input Event(s): list of input events. -
Output Event(s): list of output events . -
Start Time: the time when the Task has started . -
End Time: the time when the Task has finished . -
Duration (ms): the duration of the task in milliseconds.
7. IOEvent-userTask-starter
This section provides an overview of the ioevent-userTask-starter, and explains what is the purpose of it and how to use it.
7.1. The purpose of ioevent-userTask-starter
At working with IOEvent, you may need to manage user tasks, which are tasks that require human intervention, but in some cases you may need to manage them in a separate application and dont use the IOEvent Cockpit and this is where the ioevent-userTask-starter comes in.
This component can be added as a dependency to an application and given the appropriate configuration which is really simple, it will provide a set of endpoints that can be used to manage user tasks.
7.2. Getting Started
IOEvent-userTask-starter dependency is available in Maven Central . You can start using IOEvent by following this steps :
7.2.1. Step 0: System requirement
IOEvent-userTask-starter is developed by Spring Boot 3.1 and above, it requires Java 17 or above and Apache Kafka 2.8 or above and elasticsearch 8.x and above.
7.2.2. Step 1: Setup environment
When using ioevent-userTask-starter, you can add Elasticsearch to the same docker-compose used with IOEvent. Here is how it will look:
   version: '3.3'

volumes:
  zookeeper-data:
    driver: local
  zookeeper-log:
    driver: local
  kafka-data:
    driver: local

services:

  zookeeper:
    restart: always
    image: confluentinc/cp-zookeeper
    volumes:
      - zookeeper-data:/var/lib/zookeeper/data:Z
      - zookeeper-log:/var/lib/zookeeper/log:Z
    environment:
      ZOOKEEPER_CLIENT_PORT: '2181'
      ZOOKEEPER_ADMIN_ENABLE_SERVER: 'false'

  kafka:
    restart: always
    image: confluentinc/cp-kafka
    container_name: kafka
    volumes:
      - kafka-data:/var/lib/kafka:Z
    ports:
      - "9092:9092"
      - "29092:29092"
    environment:
      KAFKA_BROKER_ID: '0'
      KAFKA_ZOOKEEPER_CONNECT: 'zookeeper:2181'
      KAFKA_NUM_PARTITIONS: '12'
      KAFKA_COMPRESSION_TYPE: 'gzip'
      KAFKA_OFFSETS_TOPIC_REPLICATION_FACTOR: '1'
      KAFKA_TRANSACTION_STATE_LOG_REPLICATION_FACTOR: '1'
      KAFKA_TRANSACTION_STATE_LOG_MIN_ISR: '1'
      KAFKA_LISTENER_SECURITY_PROTOCOL_MAP: PLAINTEXT:PLAINTEXT,PLAINTEXT_HOST:PLAINTEXT
      KAFKA_ADVERTISED_LISTENERS: PLAINTEXT://kafka:9092,PLAINTEXT_HOST://localhost:29092
      KAFKA_CONFLUENT_SUPPORT_METRICS_ENABLE: 'false'
      KAFKA_JMX_PORT: '9091'
      KAFKA_AUTO_CREATE_TOPICS_ENABLE: 'true'
      KAFKA_AUTHORIZER_CLASS_NAME: 'kafka.security.auth.SimpleAclAuthorizer'
      KAFKA_ALLOW_EVERYONE_IF_NO_ACL_FOUND: 'true'
    links:
      - zookeeper

  elasticsearch:
    image: docker.elastic.co/elasticsearch/elasticsearch:8.7.1
    container_name: elasticsearch
    restart: unless-stopped
    ports:
      - "9200:9200"
      - "9300:9300"
    environment:
      cluster.name: docker-es-cluster
      discovery.type: single-node
      bootstrap.memory_lock: "true"
      xpack.security.enabled: "false"
      xpack.security.enrollment.enabled: "false"
7.2.3. Step 2: Add dependency
To add ioevent-userTask-starter dependency, edit your pom.xml and add :
<dependency>
    <groupId>io.ioevent</groupId>
    <artifactId>ioevent-userTask-starter</artifactId>
    <version>${last-version}</version>
</dependency>
7.2.4. Step 3: Add necessary properties
To use the ioevent-userTask-starter you need to add the adequat properties, you can add the following to your application.properties or application.yaml file:
spring:
  application:
    name: MyAppName   (1)
  kafka:
    bootstrap-servers: localhost:29092  (2)
ioevent: (3)
    application_name: Main_Application_Name (4)
prefix: MyPrefix| 1 | Application name : Required |
| 2 | Provides the initial hosts that act as the starting point for a Kafka client to discover the full set of alive servers in the cluster : Required |
| 3 | IOEvent properties which have a default values in the project except the application_name which is Required. For more details see the Developers Tools section below. |
7.2.5. Step 4 : Add @EnableIOEventUserTask
Add @EnableIOEventUserTask annotation to the "application class",
it will enable IOEventUserTaskConfiguration by loading all the beans of IOEventUserTaskConfig class.
@SpringBootApplication
@EnableIOEventUserTask
public class MyApplication {

        public static void main(String[] args) {
            SpringApplication.run(MyApplication.class, args);
    }

}
7.3. Developers Tools
To configure the ioevent-userTask-starter, you can use the following properties :
The following table lists all the properties that are applied :
| Name | Type | Default | Description |
|---|---|---|---|
ioevent.application_name |
List |
null |
Name of the main application that contains the workflow. |
ioevent.prefix |
String |
"IOEvent-" |
While topics creation the prefix will be added to all the topics declared in IOEvent annotations. |
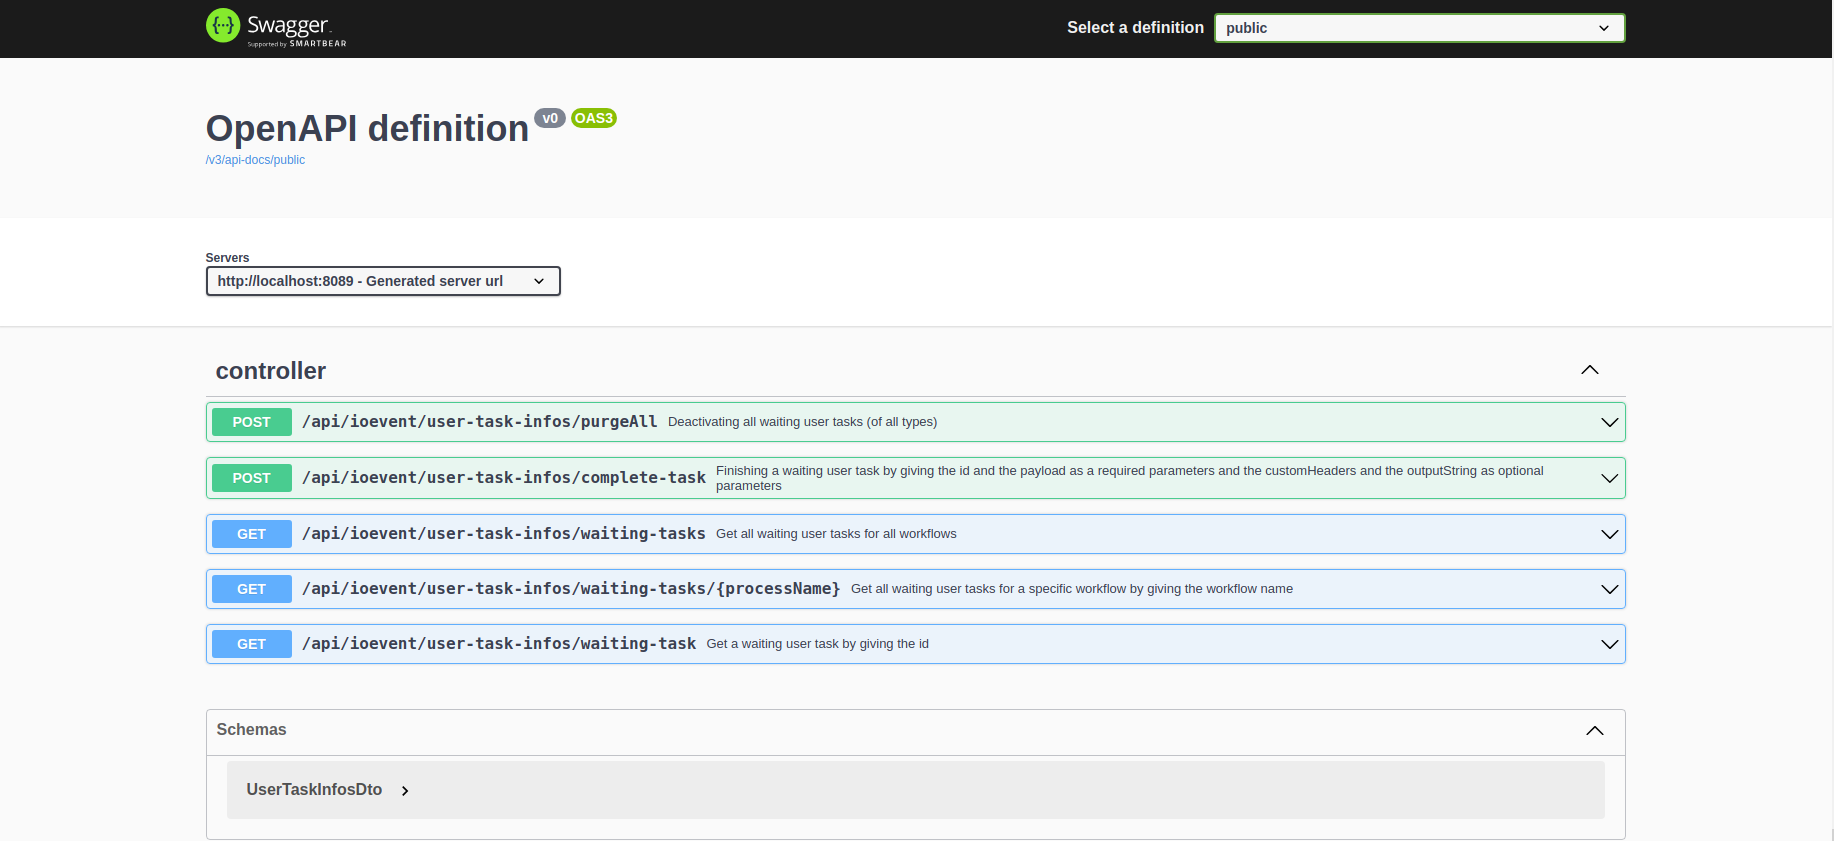
7.4. General Overview
ioevent-userTask-starter provides a set of endpoints that can be used to manage user tasks, we already have swagger documentation for the endpoints, so you can access it by adding /swagger-ui.html to the application URL.
7.4.1. Usage Example
To better understand how will the ioevent-userTask-starter look like in a real application that uses IOEvent we will see the ioevent userTask sample that we have among with other examples in our samples repository .
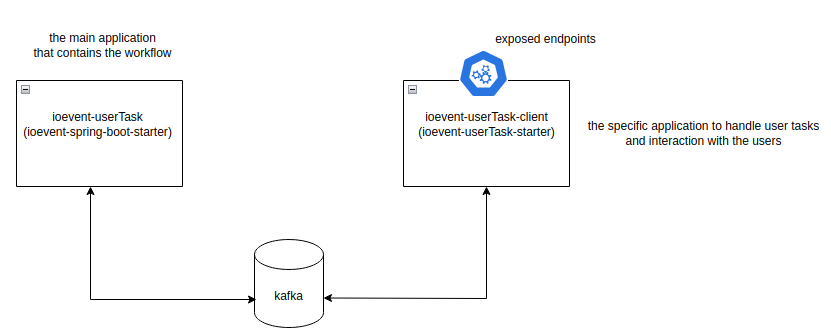
As we can see the application named ioevent-userTask-client will be in charge of managing the interaction with the user and it will expose a set of endpoints that we can see in the following section.
8. BPMN 2.0
This section provides an overview of the current BPMN 2.0 elements.
-
Tasks
Tasks can model the actual work performed in the process. Various types of tasks are supported, such as :
Service Task : Service tasks are used to invoke services.

Receive Task : Receive tasks are triggered when certain message is received.
Send Task : Send tasks are triggers for the next workflow object. Its important to mention that send and receive tasks are nothing but symbols that indicate the semantic behind the workflow task. In other word, technically there’s no difference between service, send and receive tasks, its all up to the microservice designer to determine the semantic of the task.

User Task : User task is triggered when a user, manually indicates the end of the real task (delivery, preparing food, doing paper work..).
Cockpit offers a user interface for marking finished user tasks, or u can customise your own interface using our exposed api’s.
Manual Task : Manual task works exactly like user task, but they are not assigned to a user. IOEvent doesn’t cover the concept of user yet in its core, but one way to do it is to use our exposed api’s (in user task defintion), design your own application with user definition and grant permission for each user to manage his tasks. User task with role management is coming soon in our next release
Script Task : In BPMN standard a Script Task is executed by a business process engine. The task defines a script that the engine can interpret. When it comes to IOEvent, since our framework is based on event driven design, script task runs on the microservice that the framework user implements. This will avoid bottlenecks and enhance customization options for the user.

Business Rule Task : Business Rule Task is newly added in BPMN 2.0. It provides a mechanism for a process to provide input to a Business Rules Engine and then obtain the output provided by the Business Rules Engine.In IOEvent since it doesn’t have business rules engine in it’s core, it’s the responsability of the framework user to assume if the task’s logic meets this bpmn object semantic.

-
Gateways
Gateways determine what path is taken through a process that controls the flow of both diverging and converging Sequence Flows it allows modeling decisions based on data and events.
Exclusive Gateway
A diverging Exclusive Gateway (or XOR Gateway) is used to create alternative paths within a Process flow. For a given instance of the Process, only one of the paths can be taken.
Parallel Gateway
Parallel gateways are used to represent two tasks in a business flow. It models a fork into multiple paths of execution, or a join of multiple incoming paths of execution.
-
Events
BPMN defines different Event types. The following are supported by IOEvent :
Start Event: defines the starting point of a process.

Conditional Start Event: Defines the starting point of a process if a predefined condition is true.

End Event: define the finishing point of a process.
Timer Event: Timer event creates an event after a certain configurable period of time passed.
Intermediate Message Throw Event: Throws a message to be intercepted by a catch event, and continues the process.

Intermediate Message Catch Event: When the workflow reaches this object, it’s blocked until a predefined message is arrived (thrown by a throw message event).
Message events are identified by a message key.

Error End Event: used to indicate that a certain process path ends with an error.

Error Boundary Event: used to emulate errors thrown by certain tasks.

9. Request a demo environment
You can request a demo environment by sending an email to our support team email : support@ioevent.io and we will provide you with a demo environment to test the IOEvent framework.
The IOEvent demo environment is constructed within our EKS Fargate cluster and includes all the essential components to seamlessly commence using IOEvent without the need for any installations.
We furnish you with the IOEvent Cockpit UI URL and the Kafka bootstrap servers URL, requiring you only to build your IOEvent application by providing the appropriate configuration.
Here is a brief overview of our environment along with the installed dependencies:
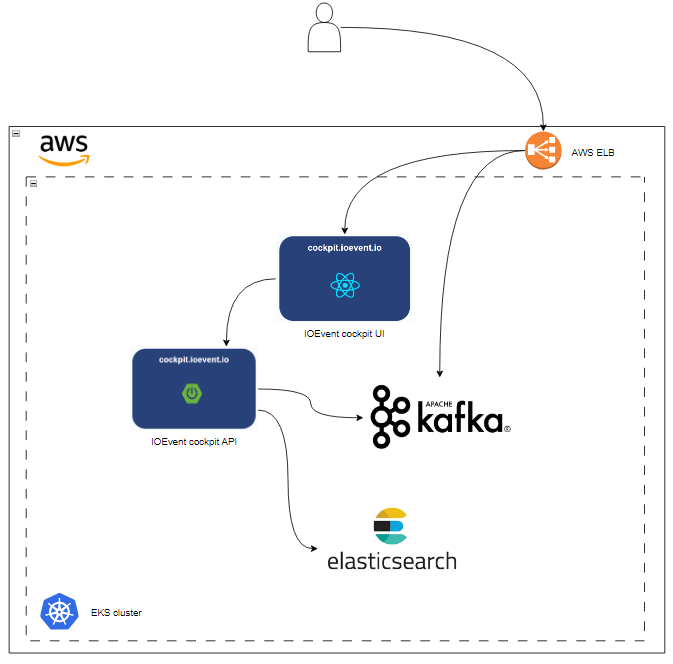
We can provide the user with the IOEvent UI URL and the Kafka bootstrap servers URL. We assume the following:
Kafka Bootstrap Servers URL: k8s-default-987897384793847.elb.eu-central-1.amazonaws.com:9094
So, this is how your application.properties file will look:
spring:
  application:
    name: appName
  kafka:
    bootstrap-servers: k8s-default-987897384793847.elb.eu-central-1.amazonaws.com:9094
10. Install IOEvent environment on your own infrastructure
You have the option to install the necessary dependencies for IOEvent and set up the environment in your own Kubernetes cluster. Alternatively, you can also install it in Minikube. We have the required Helm charts available in our Github repository.
10.1. Setup environment on Minikube
Let’s start with ioevent-minikube,
Within the 'templates', we have the Elasticsearch template where we define the necessary deployment and service and once installed, it will provide an Elasticsearch server that will be utilized by our IOEvent Cockpit.
Next, we have the 'kafka-cluster' template, we opted to employ Strimzi as a Kubernetes operator to manage our Kafka cluster, with plans to consistently upgrade versions in the future. For storage, particularly in a testing and demo environment, we chose 'ephemeral', this means that the data will be stored directly in the containers and will not persist after restarts.
Following that, we have the 'ioeventcockpitapi' template, responsible for initiating the API of our IOEvent Cockpit application. For this service, we have included an ingress to simplify URL management, eliminating the need for any URL changes. The last template is 'ioeventcockpitui,' designed for installing our IOEvent Cockpit UI.
To install this Helm chart, a functional Minikube cluster, Helm, and Kubectl are required. First, you need to install the Strimzi operator tgz using the following command directly under the Minikube directory:
helm dependency updateThe subsequent step involves installing our Helm chart:
helm install releasename . -n namespaceYou have the flexibility to customize the release name and the namespace according to your preferences.
10.2. Setup environment on Kubernetes cluster
Now, let’s move on to installing the environment on a Kubernetes cluster.
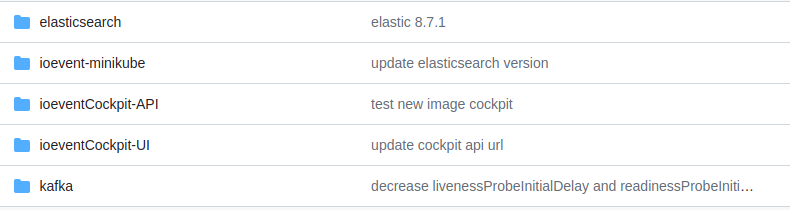
elasticsearch, ioeventCockpit-API, ioeventCockpit-UI, and kafka are four seperate Helm charts that are available in our Github repository. Each chart is responsible for installing a specific component of the IOEvent environment.
Each template in this charts is parameterized, allowing you to customize the installation according to your requirements, but we have also included default values for each parameter in the values.yaml file.
For kafka, we have included the Strimzi operator to manage the Kafka cluster, and for storage, we have chosen 'ephemeral' to store the data directly in the containers, which will not persist after restarts, it’s particularly useful in a testing and demo environment but you can change it based on your needs.
To install this Helm chart, a functional Kubernetes cluster, Helm, and Kubectl are required.
Let’s start by the kafka chart, you need to install the Strimzi operator tgz using the following command directly under the kafka chart directory:
helm dependency updateand then you can install the chart using the following command:
helm install releasename ./kafka -n namespaceYou have the flexibility to customize the release name and the namespace according to your preferences.
For kafka as you can see in the template, we added an external listener to allow the communication between the Kafka cluster and the outside world. We used LoadBalancer type along with aws annotations you can change it based on your infrastructure.
Our second chart is the elasticsearch chart, it’s responsible for installing the Elasticsearch server that will be utilized by our IOEvent Cockpit, pay attention to the compatibility between the Elasticsearch version and the version of the IOEvent Cockpit, the default values that we have in the values.yaml file are compatible with the latest version of the IOEvent Cockpit.
It can be installed using the following command:
helm install releasename ./elasticsearch -n namespaceNext, we have the ioeventCockpitAPI chart, it’s responsible for initiating the API of our IOEvent Cockpit application, you can install it using the following command:
helm install releasename ./ioeventCockpit-API -n namespaceThe last chart is ioeventCockpitUI, it’s designed for installing our IOEvent Cockpit UI, you can install it using the following command:
helm install releasename ./ioeventCockpit-UI -n namespaceBefore installing this chart you need to update the ioeventui.apiUrl value in the values.yaml file with the url of the ioeventCockpitAPI service.